Saturday, April 30, 2011

return on creativity: vintage camera embroidery no.3


I finished the third and final project in my vintage camera embroidery series.  I can't wait to get them all on the wall together.  Here are embroidery no.1 and embroidery no. 2.

The sketch for embroidery no.3 is above.


Back stitched again with black thread.


I varied six threads and two threads to create thick and thin lines.


a big idea: rolling pin stamps by alisa burke

If you are intrigued by the idea of creating your own stamps...

If you are interested in unique ways to design your own prints...

Check this out.


Go to Alisa's blog to see this genius and amazing idea...

Monday, April 25, 2011

return on creativity: scrapbook paper pillow

This post first appeared as a guest post at The Scrap Shoppe.  This project combines my love of scrapbooking with my love of sewing.


I love this piece of scrapbook paper.  The flowers are funky and seventies inspired.  I wanted to translate this print to a pillow. 


This paper comes from an SEI paper pack called Dill Blossom.


Cut a 13 inch square piece of muslin.  Grab a fine point Sharpie, a lightbox and start tracing the scrapbook paper design onto the fabric.  I taped the paper to the fabric with scotch tape so that it didn't shift.  If you don't have a lightbox, you can get the same effect with a sunny window.


Here's how my fabric looked after tracing.


and a close up...


Grab some ink pads and start adding color.  Stayz-On ink stays on through washing.  I haven't tested other inks.  I did use other inks in this project as shown above.  So if I ever have to wash the pillow we will see what happens...


I intentionally "colored outside the lines" by rubbing the stamp pads directly onto the fabric.  I decided to use a different color scheme than the original scrapbook paper. 


Sew into a 12 inch pillow with an envelope closure and insert a pillow form to finish.

Saturday, April 23, 2011

return on creativity: thumbtack home decor ball


This is a fun and simple little project using one of my favorite things, office supplies!!!  Is it just me or are office supply stores so much fun.

What you will need:


Styrofoam balls (mine are 2.5 inch diameter), duct tape (grey), thumbtacks, scissors


Make sure to get the silvery thumbtacks with flat tops.

How to make:


1.  Cut small pieces of duct tape about five to six inches long.  Then cut the tape lengthwise into three strips.  Start wrapping the tape around a Styrofoam ball.  (Keep the pieces small in order to minimize wrinkling.)


2.  Keep applying tape until the entire Styrofoam ball is covered.


3.  Start inserting push pins trying to cover as much tape as possible without overlapping the pins too much.


4.  That's it.  You are done.  Keep going until you have enough balls to fill a bowl or a vase.

I'm off to the office supply store for more pins!

Thursday, April 21, 2011

return on creativity: braided yarn pillow


You will need:
Lots of yarn
Two 13 X 13 inch squares of fabric

How to make:


1.  Make several long yarn braids.  I used nine strands of yarn to make my braids and each braid is about a yard long.  I started with ten braids, which did not get me very far.  Then I made five more braids, still not enough.  Then I made three more. 

To braid the yarn I used an "old school" friendship bracelet technique.  Tie all nine strands together at one end.  Use a safety pin to pin the knot to your sock.  Then let your foot "hold" the yarn while you braid.


2.  Begin sewing the yarn braids to one of the fabric squares.  I set my sewing machine to its longest stitch.  I left a half inch of fabric around the perimeter of the fabric.  I suggest you leave a little more fabric around the edge as I had a heck of a time sewing the whole thing together into a pillow. 


To hold the braids in place while sewing, use straight pins to pin the braids to the fabric.  I held the braids in place with my hand while I sewed. 

To make a corner sew to the end of an edge and leave your sewing machine needle down holding the fabric and yarn in place.  Raise your presser foot and turn the fabric and the yarn.  Lower the presser foot and start sewing in the opposite direction. 


3.  Sew the two fabric squares together with right sides facing.  Leave a three inch opening.  Then turn the fabric right side out, stuff, and hand stitch the pillow opening closed. 

I generally prefer to make pillow covers rather than stuffing pillows.  However, when I do stuff pillows I use cluster stuff stuffing.  I think it makes a smoother pillow than other stuffings.

Note:  Before you sew the pillow together, you could hand stitch your knots to the pillow front so that they are secure and don't flop around.  I left mine floppy as you can see in the pictures below.


Do you ever have a project that you love to hate? This pillow would be it for me. It all started with an idea that I thought would be pretty simple to execute, but ended up taking way more time than I planned.  So I don't think I will be tackling this project again, but here are some variations on this idea that I had while sewing:
  • Use different colors of yarn in the braids
  • Use solid color braids, but make braids in different colors to sew on the pillows
  • Sew the braids onto the pillows in a circle pattern rather than a square 

Wednesday, April 20, 2011

a big idea: more vintage camera embroidery inspiration

I noticed today as I was perusing Google Analytics that some folks are being directed to my blog by searching in Google for "vintage camera embroidery".  That got me thinking that others must have created some vintage camera embroidery designs.  So I did my own Google search and found the cutest embroidery patterns. 

Don't you just adore the Polaroid embroideries?  Also, I am totally in love with embroidery on printed fabric.  Embroidering on prints is definately going on my "to do" list. 

These patterns are for sale on Etsy if you'd like to give them a try.

I am currently working on camera number three in my vintage camera embroidery series.  It's coming along nicely despite finishing our taxes at the last minute on Monday (did I mention that I am also a procrastinating CPA?)  and a crazy busy time at work last week and this week.  Is it the weekend yet?

Saturday, April 16, 2011

return on creativity: vintage camera embroidery no.2


This week I finished the second vintage camera embroidery in a planned series of three.  See number one here

To make, trace the image below onto fabric with a water soluble marker using a lightbox or sunny window.  I choose a natural looking nubby muslin for my fabric.


Stitch the design with black embroidery thread using a backstitch.


I alternated thicker lines using six threads and thinner lines with two threads to provide some contrast.


When finished frame for hanging or hang in embroidery hoop.  Or maybe attach fabric to the front of a photo album...

Tuesday, April 12, 2011

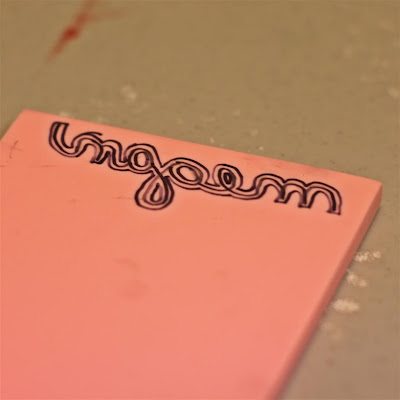
inventory control: create your own name stamp


After my first stamp making experience, I decided to make myself a personalized name stamp.  Not only can you make one for yourself, but I think these would make a nice gift for a friend who enjoys card making, stamping, or scrapbooking.  I think my sister might get one from me.

Here's what you need:

Speedball Carving Tools (various sizes)
Speedy Carve Carving Block <----- this is the best stuff
A pencil
A Sharpie
Paper
Ink
Straight Edge

Here's how you do it:


1.  Write your name on a piece of paper with a pencil.  I traced my name twice for good measure.


2.  Place your paper pencil side down on your speedy carve block.  Use a straight edge to rub the back of the paper.  This will transfer your pencil marks to the block.  Your image will be reversed.


3.  Use a Sharpie to trace around the name.


4.  Use your finest point Speedball carver to carve around your traced line.  Note:  It really is easier if you move the carving block rather than the carving tool when you are carving (particularly around curves).  I didn't really "get" this the first time.


5.  Continue carving away.  Make test stamps to see where more carving is needed.  Once finished you can mount your stamp on wood, just like a real store bought stamp. 


Related Posts Plugin for WordPress, Blogger...