Tuesday, July 12, 2011

a big idea: applique inspiration

I mentioned that I have been feeling inspired by applique lately.  Here's a little more inspiration courtesy of a search on Pinterest.


I love this peacock inspired pillow.  My grandmother had some peacock feathers in a vase in her home when I was little and I was always fascinated by them.


This deer head pillow is so dear (sorry).  I need to try a silhouette applique with printed fabric.


This bunting bag is so pretty and a great way to use up little scraps of fabric that you just can't let go of.

I think I see a golden retriever version of this bag in my future.

Give applique a try.  It's a great way to add a unique feature to your project.

Sunday, July 10, 2011

return on creativity: lil carnation tote bag


I am really feeling inspired by applique right now.  I sketched a carnation for this tote bag.  I love that this flower is on a bright red background.  Red is by far my favorite color.

I modified my bag construction a bit from the lil tree tote bag.  It's a bit wider and the bottom is a little boxy which I think gives the bag a nice shape.

Here's how to make this bag:

1.  Cut four 14 inch squares of fabric.  Two from the outer bag fabric and two from the lining fabric.  I used a home dec weight fabric for the outer bag fabric so I did not add any interfacing to this bag.

2.  Trace the flower and stem designs onto the paper side of some Wonder Under fusible web.  I've included my carnation design below.


3.  Iron the Wonder Under to the wrong side of the fabric you are using for the flower and the stem.  I used white fabric for the flower and green fabric for the stem.  Cut out the designs and remove the paper backing.

4.  Iron the flower to the right side of one of the outer bag squares.  Then place and iron on the stem.


5.  Stitch around the design using a straight stitch on your sewing machine.  Sew very close to the edge of the fabric.  I used black thread since my lining and straps are black.


6.  Put right sides of the outer back squares together and sew around three sides, leaving the top of the bag open.  Use a half inch seam allowance.

7.  Make a boxed corner on the bag by following the steps below:


Fold the  bottom corner into a point.


Measure one inch from the corner stitching and mark with a water soluble marker across the point.


Sew along the marked line.


Cut off excess fabric and repeat on other corner.

8.  Repeat steps 6 and 7 with the lining fabric.

9.  Cut two 18 inch lengths of belting and sew to the right side of the outer bag with seams matching.  Place the straps about two inches in from the seams of the bag.


10,  Place the outer bag inside the bag lining with right sides facing.  Sew around the top of the bag leaving a three inch opening.  Make sure the straps are tucked in.


11.  Pull the outer bag through the opening and turn the lining into the bag.  Top stitch around the edge of the bag, sewing the opening closed.

There you have it.  I think these little tote bags could make lovely gifts, especially if you tuck more goodies inside.  Happy sewing!


Thursday, July 7, 2011

a big idea: cardigan pillow cover


Making a pillow cover from a sweater is not a new idea.  Google "make a pillow from a cardigan" and you can see lots of great examples.  This idea is so simple and perfect that I had to give it a try.

I visited a thrift store and scored this pretty cardigan for $3 (including a shell I can use in future projects!)


I cut out the front of the cardigan along the seams.


Then I cut a square, keeping the buttons in the center (although I think this pillow would also look cute with the buttons offset.  I cut a thirteen inch square to allowing for a half inch seam allowance to fit my twelve inch pillow form.


I sewed the cardigan square to a piece of muslin, wrong sides facing.  Sew around all sides and unbutton the cardigan to turn right side out.  The genius of this idea is that you have a ready made opening to fit the pillow through.  Just sew four seams and you are done.

I was concerned about sewing the knitted fabric, but it wasn't bad.  I used a lot of pins to hold the stretchy knit in place.

That's it.  I now have an elegant and understated pillow in less than twenty minutes.  Give it a try with cardigans, men's shirts, maybe even a hoodie with a zipper?

Wednesday, July 6, 2011

a big idea: tote bag inspiration

I've gone a little tote bag crazy.  For real.  I made three the other day.  I'm making them so fast that I can't keep up with the tutorials.

Here are some tote bags that I'm crushing on from etsy.


Burlap tote bag?  I think I love it.


These striped tote bags are so inspirational.  It's amazing to me that just turning the fabric ninety degrees can result in something so fabulous.


I always think of messenger bags as slightly masculine, but no one can argue that this ruffled version is pure girly.


I'd really call this a purse, but what ever you call this bag, it's yet another reason why I should learn how to knit.

Can you ever have too many tote bags?  I'll let you know....

Monday, July 4, 2011

return on creativity: shopper tote bag


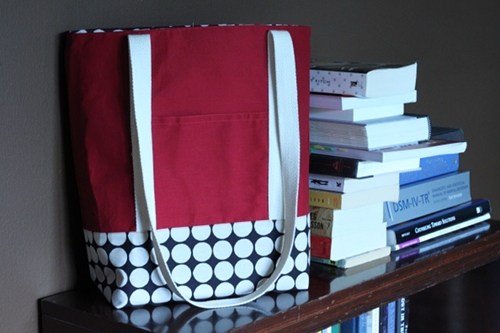
I love this Kate Spade tote bag.  Its shape is more tall and slim than short and wide.   While this tote is far from Kate Spade, the shape is inspired by her totes; perfect for a day of lunching and shopping with friends.

How to make:

1.  Cut the following:

4 - 17"X16" rectangles (2 from outer fabric, 2 from lining fabric)
2 - 16"X7" rectangles from lining fabric (this will be the bag bottom)
2 - 17"X16" rectangles of Craft Fuse interfacing (optional)
2 - 7"X12" rectangles from outer fabric (for pockets)
2 - 52" lengths of belting for handles
water soluble pen for marking fabric

2.  Iron the Craft Fuse to the wrong side of the outer fabric rectangles.  (This step is optional, but will give your bag more shape.  If you choose a weightier fabric it may not be needed.)

3.  Fold the two pocket rectangles in half to make two 7"X6" rectangles.  Press the fold with an iron.  Top stitch along the folded edge.  I also added another stitch a quarter inch below the top stitch for decoration.


4.  Mark the right side of both outer fabric rectangles like the picture below with a water soluble marker.  This will help in placing and pining the pockets and straps.


5.  Place and pin the pockets and straps as shown below on the right side of the bag.  Stitch as indicated in red.


6.  Fold down the long edge of each 16"X7" lining fabric rectangles a quarter inch.  Press the seam.

7.  Line up the raw edge of the lining fabric with the bottom of the bag outer fabric.  The wrong side of the lining fabric should face the right side of the bag.  Top stitch along the folded edge of the lining fabric covering the strap bottoms and sewing the bottom of the pocket closed.


8.  Put the wrong sides of the outer bag together and sew along three sides leaving the top open.  Use a half inch seam allowance.

9.  Follow the steps below to create a "box corner" for your bag.


Fold the bottom of the bag into a point.


Measure five inches from the corner stitching and mark with a water soluble pen.  Mark a line straight across the corner.


Sew along the marked line.  (Add a zig zag stitch for extra strength if desired.)


Cut off excess fabric.

10.  Repeat steps 8 and 9 for the 17"X16" rectangles of lining fabric.

11.  Turn the outer bag right side out and place inside the lining fabric.  Tuck the straps in too.  Right sides should be facing each other.  Sew the top of the bags together with a half inch seam allowance.  Leave a three inch opening.


12.  Pull the outer bag through the opening and turn the lining into the bag.  Top stitch around the top of the bag stitching the opening closed as you sew.  I added another stitch a quarter inch below the top stitch.

13.  Give your bag a good pressing with an iron and go shopping!


Related Posts Plugin for WordPress, Blogger...