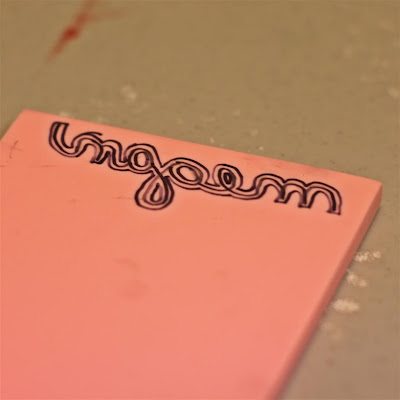
After my first stamp making experience, I decided to make myself a personalized name stamp. Not only can you make one for yourself, but I think these would make a nice gift for a friend who enjoys card making, stamping, or scrapbooking. I think my sister might get one from me.
Here's what you need:
Speedball Carving Tools
Speedy Carve Carving Block
A pencil
A Sharpie
Paper
Ink
Straight Edge
Here's how you do it:
1. Write your name on a piece of paper with a pencil. I traced my name twice for good measure.
2. Place your paper pencil side down on your speedy carve block
3. Use a Sharpie to trace around the name.
4. Use your finest point Speedball carver to carve around your traced line. Note: It really is easier if you move the carving block rather than the carving tool when you are carving (particularly around curves). I didn't really "get" this the first time.
5. Continue carving away. Make test stamps to see where more carving is needed. Once finished you can mount your stamp on wood, just like a real store bought stamp.


20 comments:
Very cute! You make it seem so easy...
wow, this is such a cool idea!!! major creativity impressed points being sent your way...haha :)
I'd love for you to link this up to my link party, Your Whims Wednesday! http://mygirlishwhims.blogspot.com/2011/04/your-whims-wednesday-2-and-features.html
Love this! It would make such a great gift :)
love this! so simple and cute!
I love how your stamp is in your own handwriting now! I can see how great this would be for a mom to do(carving) with her kids(writing their name.) Great way to commemorate their signature throughout the years. Thanks for sharing.
if I had any of those tools, I'd totally make this :)
think i'll hav to find some alternative materials to hav a go with :)
LOVE THIS! Head on over to my blog- im doing a giveaway, everything made by a 14 year old!
Oooh lala. That is so cool! Where do I find these tools, any hobby store? I'd really like to have you share this at my VIP party today... http://designergarden.blogspot.com/2011/04/vip-party-11.html
Hey crafty :) I'm guessing your name is megan! My move has gone well, I'm working full time again as well, which makes me very tired at night -_- Btw, you're going to be featured this sunday again :) Now that I'm on California time (but my blog is still on NY time), I have to do things extra early and schedule my posts! This stamp project is really cool. I've been meaning to make myself a stamp for the longest time but never got around to it. I don't know how you do it! Keep up the great work :)
Thanks for the tutorial! I've been looking for where to get a signature stamp made, but never figured it could be done at home.
I took a printmaking class in college, and this is just like it! Would love to get back into it! Thanks for the inspiration!
Would love for you to share at my link party!
http://allthingsfee.blogspot.com/2011/04/calling-all-crafters-3rd-edition.html
Wow! What a great idea. I would never have thought to be able to do this. I may have to run to the store today and try. Thanks so much for sharing!
Thank you for idea!
great idea, thanks so very much for sharing on Craft Schooling Sunday! Now I have another craft supply to add to my shopping list for my next trip to the US!
thank you for sharing how to do this. it is a wonderful idea.
How Flipping adorable~! Love it!
Love this! I've been wanting to make my own stamps for so long. Just need to get the tools to do so.
came from Spearmint Baby. I just had to click over bc I am a crafty cpa too lol. Check out my blog at www.adaywithlilmama.blogspot.com :)
loved your idea. I prefer Christmas crafts where I can use everything that is DIY and don't have to buy more supplies.
Post a Comment