

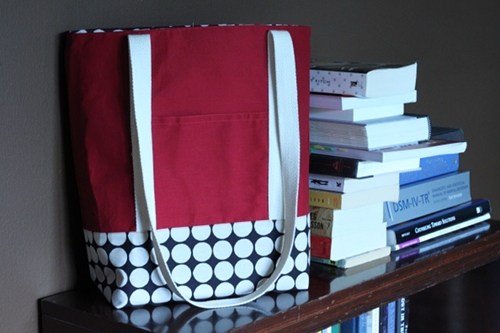
I love this Kate Spade tote bag. Its shape is more tall and slim than short and wide. While this tote is far from Kate Spade, the shape is inspired by her totes; perfect for a day of lunching and shopping with friends.
How to make:
1. Cut the following:
4 - 17"X16" rectangles (2 from outer fabric, 2 from lining fabric)
2 - 16"X7" rectangles from lining fabric (this will be the bag bottom)
2 - 17"X16" rectangles of Craft Fuse interfacing (optional)
2 - 7"X12" rectangles from outer fabric (for pockets)
2 - 52" lengths of belting for handles
water soluble pen for marking fabric
2. Iron the Craft Fuse to the wrong side of the outer fabric rectangles. (This step is optional, but will give your bag more shape. If you choose a weightier fabric it may not be needed.)
3. Fold the two pocket rectangles in half to make two 7"X6" rectangles. Press the fold with an iron. Top stitch along the folded edge. I also added another stitch a quarter inch below the top stitch for decoration.

4. Mark the right side of both outer fabric rectangles like the picture below with a water soluble marker. This will help in placing and pining the pockets and straps.

5. Place and pin the pockets and straps as shown below on the right side of the bag. Stitch as indicated in red.


6. Fold down the long edge of each 16"X7" lining fabric rectangles a quarter inch. Press the seam.
7. Line up the raw edge of the lining fabric with the bottom of the bag outer fabric. The wrong side of the lining fabric should face the right side of the bag. Top stitch along the folded edge of the lining fabric covering the strap bottoms and sewing the bottom of the pocket closed.


8. Put the wrong sides of the outer bag together and sew along three sides leaving the top open. Use a half inch seam allowance.
9. Follow the steps below to create a "box corner" for your bag.

Fold the bottom of the bag into a point.

Measure five inches from the corner stitching and mark with a water soluble pen. Mark a line straight across the corner.

Sew along the marked line. (Add a zig zag stitch for extra strength if desired.)

Cut off excess fabric.
10. Repeat steps 8 and 9 for the 17"X16" rectangles of lining fabric.
11. Turn the outer bag right side out and place inside the lining fabric. Tuck the straps in too. Right sides should be facing each other. Sew the top of the bags together with a half inch seam allowance. Leave a three inch opening.

12. Pull the outer bag through the opening and turn the lining into the bag. Top stitch around the top of the bag stitching the opening closed as you sew. I added another stitch a quarter inch below the top stitch.
13. Give your bag a good pressing with an iron and go shopping!

I like this. I like it A LOT!!!!!
ReplyDeleteYou can't have too many totes!
Its a smartest tote Megan... very lovely I like the touch of Polka dots print...
ReplyDeleteVisit me whenever you can
http://craftaworld.blogspot.com/
Love
Farah
Love it, added to must do list. Thanks so much!
ReplyDeletetotally smart tote..
ReplyDeletethanks for the awesome step by step tutorial..
Love ~
So cute and looks very sturdy. I like a bag that will stand up on it's own. So handy when you're trying to load it with groceries.
ReplyDeleteLove this bag! Oh man I wish I could sew and make me one of these! Great job!
ReplyDeleteCute! I would love it if you would link up to my Tuesday Confessional link party going on now: http://www.craftyconfessions.com/2011/07/tuesday-confessional-link-up-2.html. I hope to see you soon!
ReplyDelete~Macy from Confessions of a SAHM
This looks AMAZING,FANTASTIC,CHIC! I love it-just not sure that my sewing skills are up to the challenge yet! Great job!
ReplyDeleteLovely, maybe one day I will learn to sew. And these totes would be a fun way to practice.
ReplyDeleteLove it! I love the shape and the fabrics you chose. So chic!
ReplyDeleteLove it! you are so creative. thanks for sharing your tutorial.
ReplyDeleteIncredible!!! I ran over to see the $245 one from KS...Love yours much more!!! No kidding! Kudos. : )
ReplyDeleteM.L.
Very nice! Love it!
ReplyDeletegreat instructions and I love the tote
ReplyDeleteKAT
Cute bag...found you on Creation Corner!
ReplyDeleteThank you so much for the tutorial. Made one and posted it on my site. I linked them to your tutorial :)
ReplyDeleteGreat tote! I would love a printable version!
ReplyDelete