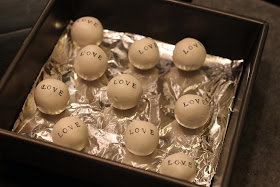
I don't know whether to call this project a work in progress, a finished project or an idea for future projects.
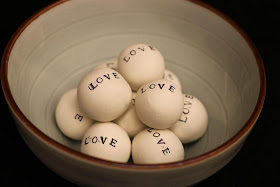
I don't think this project is finished because I'm not sure yet what I'll do with these little love balls. It's not a work in project because they are finished. So I guess I settled on calling these little balls an idea for future projects.
It all started when I decided that I wanted to play with clay. I think these little balls would make nice vase fillers, but I made mine a little big. I may make more in a smaller size.
Here's what you need:
For this project you will need aluminum foil, stamping ink, Sculpey oven bake polymer clay, and...
This Making Memories Die Set. I've had this die set forever, but rarely used it. It was a major purchase for me years ago when I was right out of college and I really fretted over the purchase so I am always happy when I use it.
Here's how to make them:
2. Flatten out some clay and wrap it around your aluminum foil ball. Roll the clay ball around in your hands to make a sphere.
3. Once you have your balls made, let them "cool" a bit from the warmth of your hands. It makes the stamping easier because the stamps won't stick to the clay.
4. Lightly press each letter stamp in ink and stamp onto the clay balls. You may be able to use traditional rubber stamps for this, but I like the impression that the die stamps make. However, since I only have one die set I may try some rubber stamps in the future for variety.
5. Bake your clay following the directions on the box. The aluminum foil center helps the clay balls bake since they don't have to bake all the way through. Also I assume that the aluminum foil heats in the oven and bakes the clay from the inside too? I baked my clay for 20 minutes.
That's it. I still have lots of clay left and lots of new ideas for clay projects. I can't wait!


Cool idea!!!! Something else for me to try. So many great ideas out there...help I'm on overload.
ReplyDeleteNo way. Foil? Ah, I love you (in a totally non creepy way I promise!). This is just so clever and cute... thanks for sharing!
ReplyDeleteStarr.. I'm with you.. I love you...lol
ReplyDeletehttp://runwithglitter.blogspot.com/
Those are way cute! . .. Yeah, not sure what I would do with them either.
ReplyDeleteSo cute! Clever to put the foil on the side to fill out the space. Mental note to self.
ReplyDeleteMichael
This is such a lovely project!
ReplyDeleteThese can be a wonderful present for a friend, colleague or family member. You can string the balls and make fabulous necklaces with lovely notes or initials. Try to think of one(two)syllable words for the notes just like "love" on your balls.
P.S. Thank you for dropping by with such a lovely comment!!
these are really LOVELY..you are so clever honey :)
ReplyDeleteWow - such a great idea!! When I first saw these I thought they were painted ping-pong balls - I NEVER would have thought they were clay covered foil! Thanks so much for sharing!!
ReplyDeleteps - I'm your newest follower :)
Hi Megan, what a fantastic idea! I feel like now I want to take this process and try to make it work in multiple different variations. What a cute concept, it makes me think of a certain snowman project we did as kids with my mom, where we also put foil in the middle. I came to check out your blog after you posted on mine, and I have to say, I love your decorating style. Some of the nicest stuff I've seen, I'm totally following you now. Hope you'll do the same!
ReplyDeleteOh wow! What a cool idea. Love it. I'm definitely going to be trying it.
ReplyDeleteCheers,
Tracy All Thumbs Crafts
"Love" them! Really do! I think they're fantastic! So glad I saw your link-up at Petite Hermine!
ReplyDeleteJenn/Rook No. 17
Great idea- endless possibilities here!
ReplyDeleteLove them!
ReplyDeleteI love these! I think it's the straw that broke the camel's back in my desire to get some of those type-setter stamps (or whatever they're called...) so many uses!!!! love it.
ReplyDeleteThese are super cute! They would look great in an apothocary jar with a big fat ribbon around it or something ;) We would love to see it in our current linky party! Feel free to stop by :) lollyjaneboutique.blogspot.com
ReplyDeleteWow - this is awesome - you have a lot of great stuff here! Thanks for stopping by my little blog. :)
ReplyDeleteI like these a lot! I'm not sure how I would use them either, but I'm certain there are plenty of fun uses for them! Thanks for stopping by my blog, I'll be your newest follower, I hope you'll follow me back!
ReplyDeleteHi Megan!
ReplyDeleteThanks for stopping by my blog. This is such a cute idea! Cute blog :-)
Such a fun project! I don't have any of the die stamps, but I do have plenty of rubber stamps. I'll have to give them a try. Thanks for sharing.
ReplyDeleteomg!...i'm in love with these!...too freaking adorable!...
ReplyDeleteLove, love, love these! I've never used clay but I think I might just go buy some tomorrow, thanks for a wonderful tutorial.
ReplyDeleteI love this but I'm to completely inpatient to do it with clay...but you just inspired me to go buy some ping pong balls and try it with those!
ReplyDeleteYeah - a craft I have everything for. I officially declared clay as the new burlap on my FB page (not that anyone cares what I say!).
ReplyDeleteThese balls are so cute...very clever and they look so stylish and chic. I am a new follower.
Holly
504 Main
I just love these. I'd love to make them with Christmas or Easter themed words. I especially love the "type" style lettering.
ReplyDeleteThese are soooo sweet...you had a great idea here!
ReplyDeleteBlessings,
Linda
Great idea! So creative! Thanks for sharing!
ReplyDeletehttp://lucyluvinyl.blogspot.com/
Sooo cute!! I "LOVE" it!
ReplyDeleteI love this project... I have to give it a try. I only have rubber stamps,so I will let you know if it works. Have a great week!
ReplyDeleteI'm definitely feeling the love! What a great project. I like the use of clay and your stamps - very nice.
ReplyDeleteSooo... this is just an awesome project. I can't wait to try it!
ReplyDeleteI just love these! Thanks for sharing!
ReplyDeleteLovely idea. I think you can use these for many projects! I once owned many stamps when I was younger, and I wish I didn't get rid of them. Sigh.
ReplyDeleteBTW, I received the "Blog Ideas" book in the mail a week ago, and I absolutely love it. I've been taking it to work with me! I'm hoping to write a blog about it this weekend. Thanks again!
Gabby :)
This is such an awesome idea! I love it!
ReplyDeleteI LOVE these!!
ReplyDeleteThese are way too adorable and the foil inside is brilliant! I love spheres, so I'll have to try these. Thank you!
ReplyDeleteThese are WAAYYY cute. I used these love balls as inspiration in a craft I just finished, and linked back to you here in my post:
ReplyDeletehttp://craftyladylindsay.blogspot.com/2011/01/burner-cover-wall-hangings-with-cutsom.html
Feel free to grab a featured bytton from my sidebar if you'd like:)
Awesome stuff!
Lindsay
These are terrific , id love to feature them, let me know if this would be ok lauren
ReplyDelete