Showing posts with label Return on Creativity. Show all posts

Sunday, February 17, 2013

doodle frames


Several months ago I purchased a Dremel wood burning tool, but besides playing around with burning some scrap pieces of wood I still hadn't found a satisfying project on which to use it.

Even more months before buying the wood burning tool I bought some wood frames from Michael's with intentions of using them to frame some embroideries that still haven't been created.

So the other day I thought...unused wood burning tool + unused wooden frames...dare I combine the two into a project?  I did dare.  And doodle frames were born!

This is really a quite easy project although you do need a bit of a steady hand.  This is definately not a project for kids.  In fact I would make sure all kids, dogs, cats, and husbands are far away.  The wood burner gets shockingly hot, combine that with a cord and you can end up with a flaming, swinging, hot dagger if you aren't super careful.


Here are the tips that came with my Dremel wood burning tool.


They twist on to the top.  Plug in and let your tool get hot and you are ready to draw.  It takes a little practice to get the right technique and figure out which tip you want to use for which type of line.  I drew my designs on the frames in pencil as a guide.  In order to get a doodley scribbly effect I traced my lines several times.  This also helped disguise and screw ups.  :)

Here is how they turned out...


Try this technique for an easy way to add some interest or a personal touch to a cheap wooden frame.  

Thanks for visiting!

Monday, March 5, 2012

return on creativity: free motion embroidery herb pillow


A few weeks ago I made a daffodil pillow using a free motion embroidery technique.  I decided to make an herb pillow using the same font and technique as the daffodil pillow.  I'm still perfecting my technique, but I think it looks very rustic and springy.  Give it a try and thanks for reading!


Tuesday, February 28, 2012

return on creativity: new pillow cover ideas


I made some new pillows for my shop using black fabric paint.  The all is well pillow was inspired by three word sayings like "Life is good" or "Live Laugh Love".  I hand painted the words and then sewed red felt applique accents in the loops of the letters.


I used an eclectic grouping of my collection of foam stamps to create this alphabet pillow.  I bought most of my stamps years ago.  They are mostly from Making Memories and no longer sold, but I found a set on Amazon here.  I love my foam stamps.  I use them on paper and fabric.  If you find some snatch them up! 

This is my favorite tutorial for sewing pillow covers.  It doesn't win the prize for the prettiest pillow in my opinion, but the measurements seem to work really well for me.


Happy sewing and thanks for reading!

Sunday, February 26, 2012

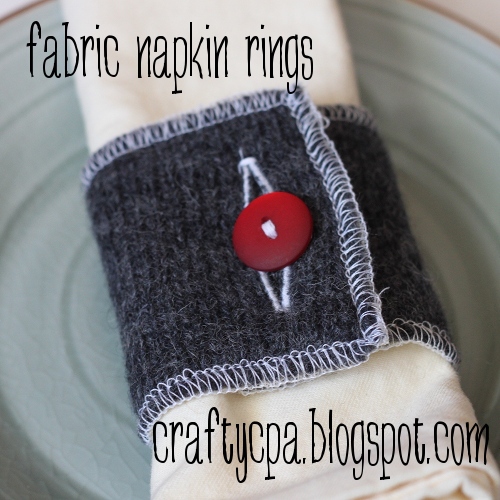
return on creativity: fabric napkin rings


Fabric napkin rings are a great idea for using up scraps of fabric that you love.

Here's how to make your own fabric napkin rings.

1.  Cut two rectangles of fabric measuring nine inches by three inches for each ring.


2.  Stitch two rectangles together.  I used my serger to stitch two wrong sides together.  If you don't have a serger you could turn down the edges of each rectangle a quarter inch and steam with an iron.  Then put wrong sides together and top stitch around all sides of the rectangle.


3.  Sew a button hole one inch in from the edge of the napkin ring.


4.  Sew a button six inches from the button hole.  (I learned how to sew buttons with my sewing machine for this project.  Holy cow!  So easy!  I followed my sewing machine manual, but here is a great tutorial.  Seriously...why did I ever sew a button by hand?)


That's it!  You are done.  Below are some of the napkin rings I made that are for sale in my shop.

Happy sewing and thanks for reading!


Monday, February 13, 2012

return on creativity: daffodil pillow


It's super snowy here today, but I am ready for spring.  I made this daffodil pillow this weekend.  Daffodils are by far my favorite flower.  I love the yellow color.  

I did some free motion embroidery on this pillow.  I first tried this technique on my shabby rose pillow.  I'm still honing my skills with this technique so my pillow is not perfect, but I still really like it and I want to get better at this technique.  Here is a great article on free motion embroidery that I found really informative.

Here's how I made my pillow:

1.  I sketched a daffodil and combined my sketch with a script font to create my template.  I printed both the sketch and the word bloom on white paper and cut them out.  Then I pasted each to piece of 12 by 12 paper.


Here's my sketch.


Here's my template.  I used the font The Only Exception.

2.  I then used scotch tape to tape my template to the back of my pillow to prepare for tracing my design.


3.  I traced my design onto the pillow front with a Disappearing Ink Marking Pen and a light box.


4.  I put the darning foot on my sewing machine, dropped the feed dogs, and set my stitch length to 0.  Then I started tracing my design with stitches by guiding the fabric under the needle.


5.  Finally I sewed everything together into a 18 X 18 pillow cover.

Give free motion embroidery a try.  I hope you like it as well as I do!


Sunday, January 22, 2012

return on creativity: clay candle holder


I dipped my toe into the genre of sculpture just barely and came out with what I'm going to call a candle holder...  I'm considering this project a prototype that can use a little tweaking, but I love the idea of it and wanted to share it with you.


I started by rolling out some Sculpey polymer clay and cutting out a leaf design.  I used these Wilton leaf cookie cutters.


I cut out four leaves and laid them on my mold (a metal one cup measuring cup).


Then I added a circle cut out for a base.  I baked my sculpture per the clay instructions.


I put a votive candle inside to create a little sculptural candle holder.


I think if I can find a bigger candle to fill up the space a bit more it would be perfect.


Or just add a circle cut out to the center and enjoy my creation as a sculpture.

Give it a try, modify, perfect and let me know what you think.  Thanks for reading and subscribing!
Related Posts Plugin for WordPress, Blogger...