A few weeks ago I made a daffodil pillow using a free motion embroidery technique. I decided to make an herb pillow using the same font and technique as the daffodil pillow. I'm still perfecting my technique, but I think it looks very rustic and springy. Give it a try and thanks for reading!
Showing posts with label sewing. Show all posts
Monday, March 5, 2012
Saturday, March 3, 2012
inspired by: upcycling
Thrift stores, antique malls, and even Etsy shops are great places to find interesting vintage fabrics for sewing projects.
I bought some vintage pillow cases from this Etsy shop and made one into the daisy pillow cover shown above. Shhhhhh... I have a pretty cool vintage pillow case project in process, but not ready to show yet!
I'm always on the lookout for great wool cardigans to make into pretty cardigan pillow covers. Here's my cardigan pillow cover tutorial.
When a bought a blanket on sale it came with two pillow shams that I didn't need. So I made one sham into a gold pillow cover.
I always snatch up vintage leather belts to turn into bag straps like in this grain sack messenger bag.
What are your favorite things to upcycle in projects?
Labels:
inspired by,
sewing
Tuesday, February 28, 2012
return on creativity: new pillow cover ideas
I made some new pillows for my shop using black fabric paint
. The all is well pillow was inspired by three word sayings like "Life is good" or "Live Laugh Love". I hand painted the words and then sewed red felt applique accents in the loops of the letters.
I used an eclectic grouping of my collection of foam stamps to create this alphabet pillow. I bought most of my stamps years ago. They are mostly from Making Memories and no longer sold, but I found a set on Amazon here.
I love my foam stamps. I use them on paper and fabric. If you find some snatch them up!
This is my favorite tutorial for sewing pillow covers. It doesn't win the prize for the prettiest pillow in my opinion, but the measurements seem to work really well for me.
Happy sewing and thanks for reading!
Labels:
paint,
Return on Creativity,
sewing
Sunday, February 26, 2012
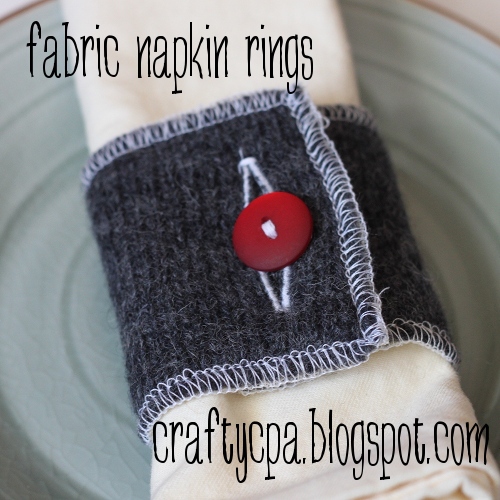
return on creativity: fabric napkin rings
Fabric napkin rings are a great idea for using up scraps of fabric that you love.
Here's how to make your own fabric napkin rings.
1. Cut two rectangles of fabric measuring nine inches by three inches for each ring.
2. Stitch two rectangles together. I used my serger to stitch two wrong sides together. If you don't have a serger you could turn down the edges of each rectangle a quarter inch and steam with an iron. Then put wrong sides together and top stitch around all sides of the rectangle.
3. Sew a button hole one inch in from the edge of the napkin ring.
4. Sew a button six inches from the button hole. (I learned how to sew buttons with my sewing machine for this project. Holy cow! So easy! I followed my sewing machine manual, but here is a great tutorial. Seriously...why did I ever sew a button by hand?)
That's it! You are done. Below are some of the napkin rings I made that are for sale in my shop.
Happy sewing and thanks for reading!
Labels:
Return on Creativity,
sewing
Monday, February 13, 2012
return on creativity: daffodil pillow
It's super snowy here today, but I am ready for spring. I made this daffodil pillow this weekend. Daffodils are by far my favorite flower. I love the yellow color.
I did some free motion embroidery on this pillow. I first tried this technique on my shabby rose pillow. I'm still honing my skills with this technique so my pillow is not perfect, but I still really like it and I want to get better at this technique. Here is a great article on free motion embroidery that I found really informative.
Here's how I made my pillow:
1. I sketched a daffodil and combined my sketch with a script font to create my template. I printed both the sketch and the word bloom on white paper and cut them out. Then I pasted each to piece of 12 by 12 paper.
Here's my sketch.
Here's my template. I used the font The Only Exception.
2. I then used scotch tape to tape my template to the back of my pillow to prepare for tracing my design.
4. I put the darning foot on my sewing machine, dropped the feed dogs, and set my stitch length to 0. Then I started tracing my design with stitches by guiding the fabric under the needle.
5. Finally I sewed everything together into a 18 X 18 pillow cover.
Give free motion embroidery a try. I hope you like it as well as I do!
Labels:
embroidery,
Return on Creativity,
sewing
Tuesday, January 10, 2012
return on creativity: star applique pillow
I made this star applique pillow this weekend. It was so easy and fun. Here's how to do your own star applique:
1. Draw a star on a piece of paper (just like your grade school teacher did at the top of your papers!)
2. Trace around the star to create a template for your fabric.
3. Cut your star tracing out of fabric. I used felt since the edges don't fray.
4. Pin or hold your star onto your fabric and sew a star just like you drew in step 1. It's really pretty easy to sew because it is all straight lines! When you get to the end of one straight line leave your needle in the fabric, lift your presser foot and sew in the next direction.
Pretty fun and I think they look cute!
Labels:
applique,
Return on Creativity,
sewing
Tuesday, December 20, 2011
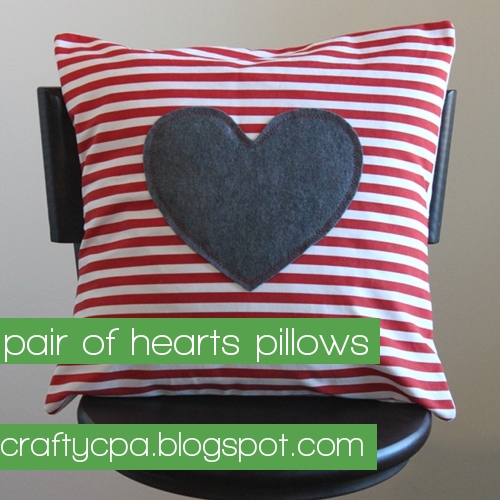
return on creativity: pair of hearts pillows
I've been looking for striped fabric ever since I pined the beautiful striped bags in this post. I finally found what I was looking for at Ikea in red stripes and black stripes.
I'm a little embarrassed to admit where the inspiration for this pillow came from. I was flipping channels and landed on the movie, "Friday" long enough to see a character wearing a striped shirt with a heart on the front. I then quickly figured out that this was not my kind of movie (Wikipedia defines it as a stoner comedy-drama-buddy film) and moved on down the channel.
I guess inspiration really does come from the strangest places!
To make this pillow I cut a heart template from typing paper First-Grade-style by folding the paper in half and cutting half a heart.
Then I traced the heart onto some felt and cut it out.
I pined the heart in the center of my eighteen inch square of striped pillow fabric.
I set my machine to a zig zag stitch and sewed around the edge of my heart.
Finally I sewed my pillow top into a pillow cover with an envelope closure. I used white muslin for the back.
I think these pillows would look fantastic in a teen's room or a dorm room or even my room!
Labels:
Return on Creativity,
sewing
Subscribe to:
Posts (Atom)