Showing posts with label home improvement. Show all posts

Tuesday, June 21, 2011

work in progress: painting kitchen cabinets

My summer project is to make my kitchen more cute.  So far I made kitchen curtains and hung some fabric flowers.  My latest upgrade is painting the kitchen cabinets.  


Actually this project was delegated to my husband who is on summer break.  He did a wonderful job, with one exception...when I asked him to take a "before" picture for my blog this is what I got:


So I don't have a before shot of the whole kitchen, but this should give you an idea of what we were dealing with.

Tony used a Rust-oleum cabinet painting kit that we saw at Home Depot.  Tony had no complaints with the product beyond the normal it's-sure-a-pain-in-the-butt-to-paint-kitchen-cabinet gripes.  It's a multi step process that takes some time, but the results look great.  Our color is called federal grey.


While we were at it, we changed out our pulls too.  We reused our knobs.  I have always loved the look of these "bin style" pulls.  I think it looks really nice with the grey.  These were also purchased at Home Depot.  They are part of the Martha Stewart collection.


Here's a look at the other side of the kitchen.  I just love it.  Overall the kitchen is looks brighter and more fresh.  Our cabinets were really starting to show some wear and tear and we aren't planning to replace them for a few years.  I will be curious to see how this paint job holds up.

Next stop is accessories!!!

Thursday, June 9, 2011

work in progress: kitchen window part 2

After I made new curtains for my kitchen window, I felt like it still needed a couple things.  My idea was to make a "valance" out of fabric flower garland.  I found some great tutorials here and here.  Somehow during the creative process I ended up with hanging flowers instead.


To make the flowers, first cut out a lot of fabric circles.  There are about thirty circles in each flower.  My grey flowers were a bit smaller and made of circles with a 3.5 inch diameter.  The yellow and blue flowers are larger and made of circles with a 4 inch diameter.


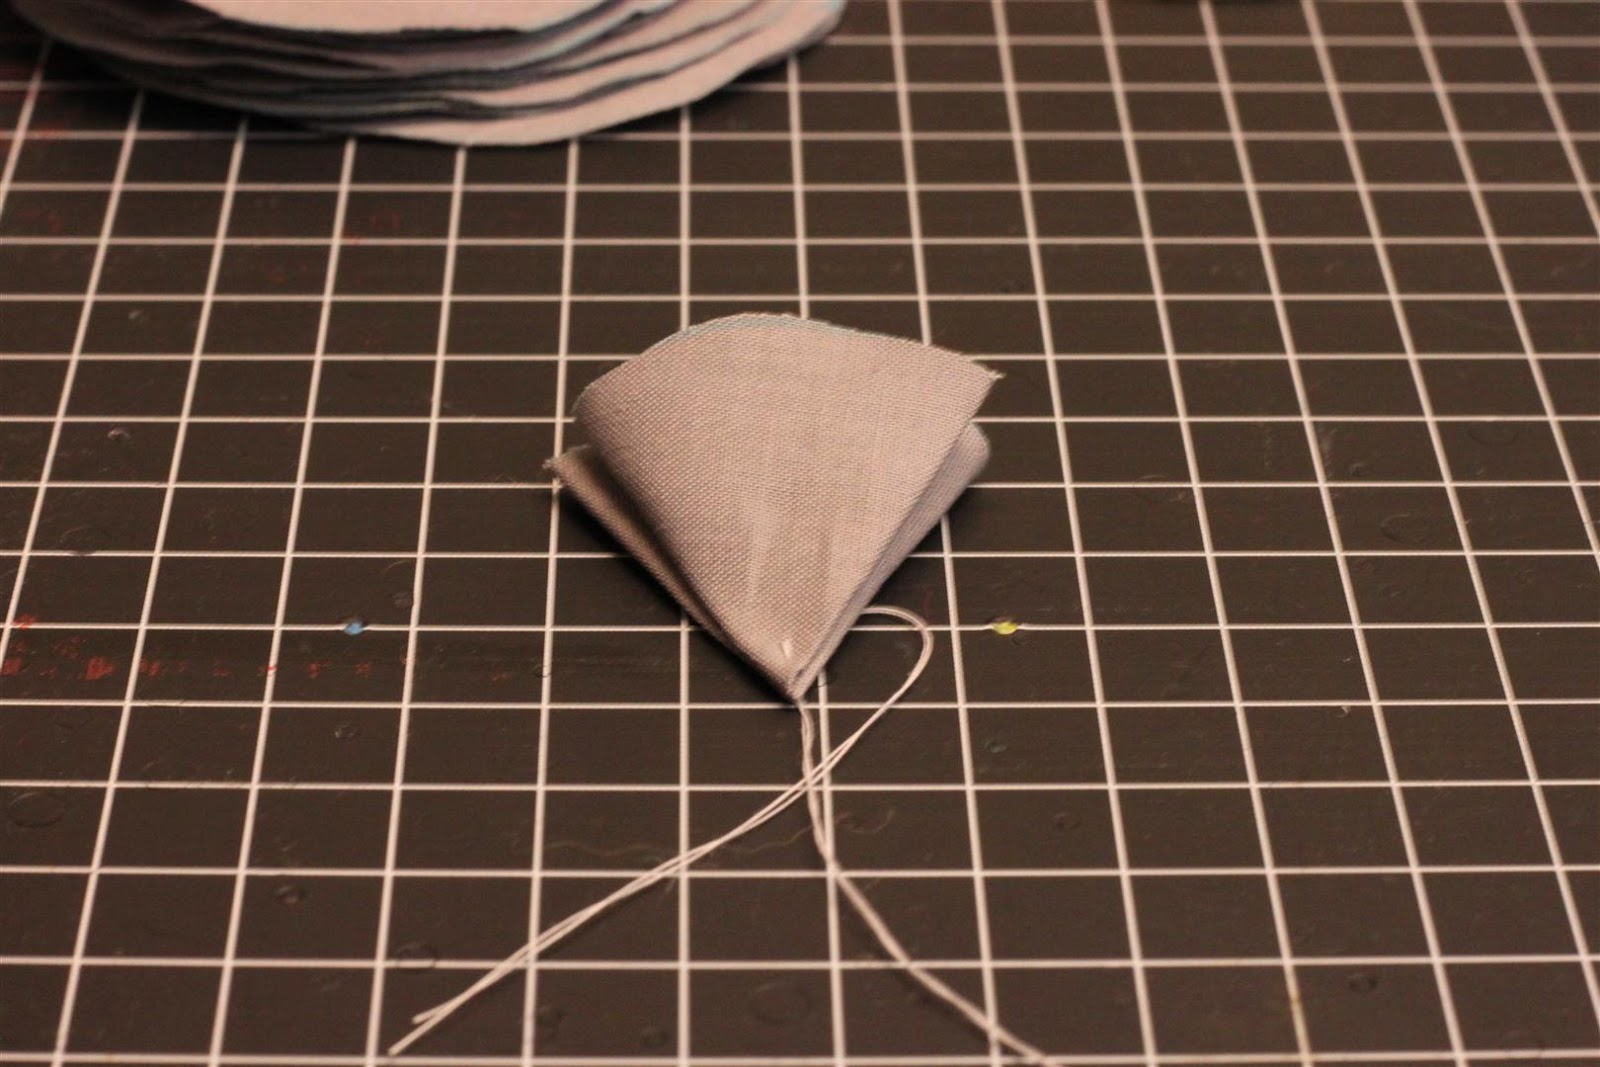
Fold each circle in half.


Then hold into thirds like an accordion.


Use a needle and thread to thread the circles together.  Pierce the needle through the point and thread all circles together.


Pull circles tight together and tie thread together.  Fluff out your flower a bit.  With this many circles the flower actually becomes more of a ball.


Hang your circle flowers all over the house!

Tuesday, May 24, 2011

work in progress: memory clothesline


I'm home from a wonderful trip visiting family in Arizona.  I carried my squatty tote bag on the plane and it made it through security just fine (twice).  I read Scandinavian Stitches on the plane and picked up some new ideas.  I gave my mother the woven fabric pillow as a belated Mother's Day gift. 

All in all a great trip.  One to remember.

I picked up some Arizona post cards at the airport and decided to make a memory clothesline to hang some summer memories.


I screwed some hooks into my chalkboard cabinets and strung some jute between the hooks.  Then I used some pretty silver clips to hang my post cards.


I can't wait to add to my collection with flowers found on summer hikes, paper coasters collected from outdoor patio restaurants, nature brochures from camping trips, and whatever else I pick up this summer.


What would you collect on your memory clothesline?

Friday, May 20, 2011

work in progress: kitchen window part 1

Our kitchen is pretty much original and untouched in our early eighties home.  It's not as bad as it could be, but definitely not a showplace kitchen.  We are currently putting away money for a total regut-reconfiguration-serious-kitchen-redo which will probably happen in four years.  I have some little inexpensive projects lined up this summer to make the kitchen a bit more cute.

Last weekend I decided to make some kitchen curtains.  When we moved into our home there were standard mini blinds installed in this window.  Unfortunately if you didn't pull the cord just right when you tried to lower them, the blinds would completely fall down. 


So I removed the blinds and the window has been naked ever since.


I had intended to sew a simple valance, but then I saw this picture was inspired to sew some longer curtains.


I made my curtains from pretty natural linen fabric and some Martha Stewart ribbon I bought at Michaels awhile ago (proving that if you buy ribbon you will always eventually find something to use it for).  The curtains are pretty simple.  I just measured and cut and hemmed all the raw edges.  Since I used drape clips I didn't even sew a pocket for the curtain rod.


After much internal debate I put a little ruffle into the ribbon.  I folded and pined the ribbon into place and then sewed down both of the white stripes in the ribbon with white thread.  It worked great and easy peasy.

Spoiler Alert!  The grey in the ribbon will look great with the color I intend to use to paint the kitchen cabinets this summer.

Stay tuned for more inexpensive kitchen upgrades!

Saturday, April 23, 2011

return on creativity: thumbtack home decor ball


This is a fun and simple little project using one of my favorite things, office supplies!!!  Is it just me or are office supply stores so much fun.

What you will need:


Styrofoam balls (mine are 2.5 inch diameter), duct tape (grey), thumbtacks, scissors


Make sure to get the silvery thumbtacks with flat tops.

How to make:


1.  Cut small pieces of duct tape about five to six inches long.  Then cut the tape lengthwise into three strips.  Start wrapping the tape around a Styrofoam ball.  (Keep the pieces small in order to minimize wrinkling.)


2.  Keep applying tape until the entire Styrofoam ball is covered.


3.  Start inserting push pins trying to cover as much tape as possible without overlapping the pins too much.


4.  That's it.  You are done.  Keep going until you have enough balls to fill a bowl or a vase.

I'm off to the office supply store for more pins!

Saturday, March 26, 2011

me: spring chalboard update


Despite the fact that we are currently experiencing our second snowfall this week, I decided that it is time to update my kitchen cabinet chalkboard for spring.


If you draw it, it will come?

Tuesday, March 1, 2011

work in progress: family room art gallery


I lived with these four papers taped to my walls for days in order to determine if I wanted to buy these frames.


I finally took the plunge and now it is on to the next phase, choosing art.

Option 1:


Option 2:


1.  Flown.  2.  A Bird in the Hand  3.  Becoming  4.  A Wish

Decisions, decisions...

Wednesday, February 16, 2011

fixed assets: vintage keys


I like keys.  They can be elegant and tall or short and stocky.  Some keys are decorated like fine china and others are purely utilitarian.  Keys lock away secrets or open the door to new possibilities.  I grew up in a small town and we rarely used keys.  We only locked the house if we were going on vacation, and then we had to search for the key.


Years ago I bought some vintage keys at a flea market.  I put my keys into a shadow box, strung up with pretty velvet ribbon and attached with pearl head pins.


Interestingly, lately I have seen vintage keys popping up at home decor stores.


I must not be the only one who loves keys!

Sunday, February 6, 2011

fixed assets: my first etsy purchase

I can browse etsy for hours looking for inspiration.  I like to look at bags people have sewn.  The decorative pillows always give me great ideas.  Scrolling through the vintage wares gets me all excited to stroll through the weekend flea market. 

Finally I took the plunge made my first etsy purchase.  I bought these vinyl winter trees.  The process of installing these terrified me.  I imagined frustration and tears ending with me surrounded by a pile of twisted vinyl.   I started soliciting my husband's help while waiting for my purchase to arrive.  Help from the husband can always be a dicey situation.  He's always willing to lend a hand, but he is not nearly as careful and precise as I am.  Projects are always a delecate balance of me trying to give him enough constructive feedback to get the results I want, but not too much nagging constructive feedback that I lose his help all together.  These trees seemed to be a recipe for disaster. 

My fears were not extiguished when I opened the box and rolls of vinyl tree pieces spilled out.  I didn't expect to have to assemble the trees myself.  I knew this was a project I would have to handle myself.  So I pulled out my step stool and went to work.

Much to my happy surprise it was so easy and fun to put these up.  And the results?  I love them.


I'm now staring at other blank walls in my house, wondering where I should stick my next vinyl masterpiece.

Friday, February 4, 2011

return on creativity: chalkboard paint + kitchen cabinets


Our home was built in the early eighties; not an era of great architecture.  Most homes built in the early eighties are short on architectural interest and short on contemporary innovations in floor plans like great rooms, big kitchens, and luxurious bathrooms. 

While we are lucky to have some nice architectural features in our house, but our floor plan leaves much to be desired.  Our kitchen is small.  The cabinets are original to the home and not in great shape.  The worst part of our cabinets is the backs which face the family room and are covered with an unattractive-seventiesish-wood like paneling.  Our master financial plan indicates that we will be living with this kitchen for another four years.  So we make the best of it.

Suddenly one day I felt inspired cover this offensive panelling in chalkboard paint.  I sat with this inspiration for a few weeks and I consulted my husband, who was skeptical.  Finally I decided that anything I did had to be better than the panelling.


I really like the results. This project has helped me decide to take the plunge and paint the rest of the cabinets this summer.  Currently I am living with chalk trees for winter.  Future chalkboard creation possibilities:
  • love notes for Valentines day
  • welcome notes for guests
  • menus for dinner parties
  • inspiring quotes
  • spring flowers with colored chalk
  • white vinyl repositionable letters
  • a massive calendar
Other ideas?

Sunday, January 23, 2011

fixed assets: new photo collage


Decorating a home just the way you want it takes time.  Until recently the walls in my home have been basically bare.  Partly because I have been focusing on other details, partly because my husband was reluctant to let me put anything on the walls at all.  Weird, huh?

Well, it all goes back to my hubby's childhood.  He was scarred.  He suffered home decor abuse by a mother who was a "country home" decorator.  I personally don't have anything against her decor, some of it actually appeals to me, but you definitely could not call it minimalist.  Every surface, every square foot of wall space is covered with country goodies.  Because of this my husband has a hatred for clutter.  He is drawn to long clear spaces of nothing.  It's taken me awhile convince him that hanging things on the wall can be good.

OK, back to the photo collage.  I was flipping though a Pottery Barn catalog when I became inspired by this:


My husband would have a coronary if he saw this picture.  However, I wanted to give it a try in my own home.  First I purchased two burlap mat frames from Pottery Barn because I loved them and I knew I would never be able to find a substitute that I loved as much somewhere else.  I found a letter L at Hobby Lobby for $10.  I loved the shape, but hated the gold color.  So I painted it red (which took several coats).


There are a lot of wooden elements in the catalog picture, so I found these old letterpress Ls that sit on top one of the larger frames.


I also love the large unmatted photos from the catalog photo.  I purchased some large frames from Target, but may not use the mats when I decide which photos to frame. 


So now there's only one thing missing...photos.  I have other photos on display in the house with family pictures and travel pictures.  I'd like to fill these frames with more artsy pictures, possibly pictures from the historic downtown area of my suburb.  But for now they sit empty, waiting for photos.
Related Posts Plugin for WordPress, Blogger...